Chiles rellenos, like so many traditional Mexican dishes, have variations in their preparation from household to household and region to region: From the kinds of chiles used, what you stuff them with, and whether or not to batter them, the individual choices are nearly endless.
I grew up on two different preparations for chiles rellenos: my mother’s and my father’s. Both used Anaheim chiles, which were the preferred chile in our household (although I remember Dad occasionally using poblanos). Both versions were equally delicious, but the time and energy to make them were very different.
Dad’s method was more labor-intensive. The smell of roasting chiles filled the house, whetting everyone’s appetite as Dad spent an hour roasting the chiles a couple at a time, directly over the flames of two stovetop burners. Then the chiles had to hang out in a plastic bag for a bit to sweat before being peeled and seeded, stuffed, battered and fried.
On the other hand, Mom would reach for a large can or two of already roasted, peeled and seeded Ortega Roasted Green Chiles (which are Anaheim chiles). And it had to be Ortega. No other brand met her standards. Needless to say, when Mom made her chiles rellenos, dinner was on the table a whole lot faster.

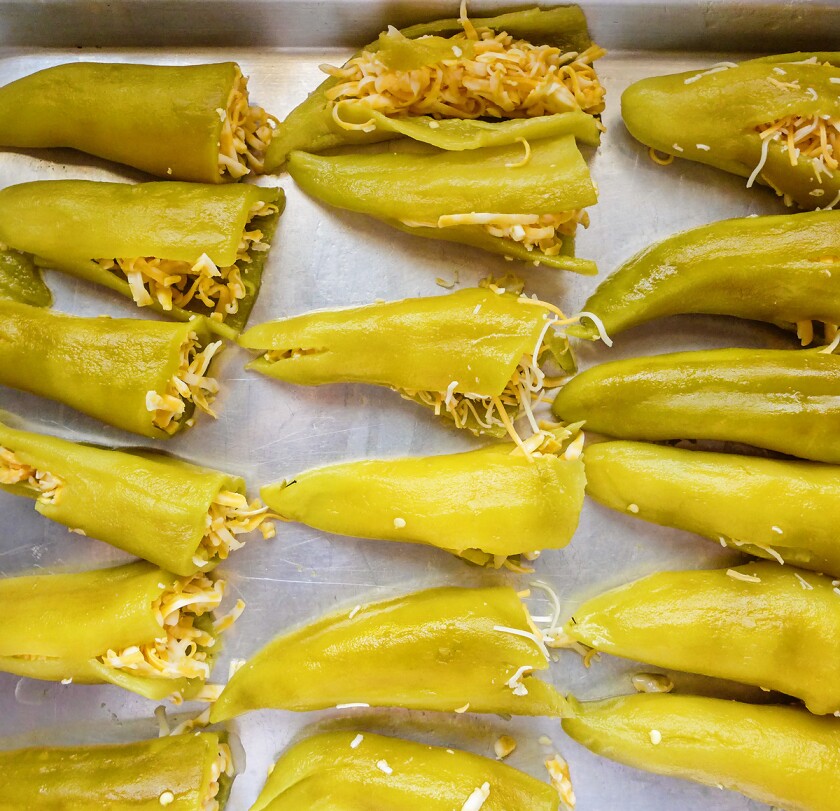
Stuff all the chiles, then roll in flour just before dipping into the egg batter.
(Anita L. Arambula / Confessions of a Foodie)
Not long ago, wanting to free up space in my email account, I started sorting through old correspondence. I came across a few emails from my mother for a group email recipe exchange we were into back in the late 90s (this is how we did it before Pinterest and Facebook!). One of the recipes she shared was for her chiles rellenos. Reading her description of the dish made me nostalgic for this childhood favorite.
The next evening, I stopped at the store on the way home from work and picked up two small cans of chiles and some Colby Jack cheese (Mom’s preferred cheese for stuffing chiles and enchiladas) to make a small batch for a midweek dinner. The cans had four whole chiles each, so I had enough for dinner for my grandmother and me, plus lunch for us both the next day. Care to guess how long it took me to make our midweek dinner? Forty minutes! Yup, 40 minutes from pulling out the ingredients to the plating. Those canned chiles are such a time-saver!
About two weeks later, I was preparing chiles for this recipe shoot. Grams walked into the kitchen to see what I was doing. She stood silently next to me, watching as I stuffed and stopped to shoot and stuffed and shot and finally asked if that’s how I had made them for her before, and I said yes, it was my mom’s quick and easy recipe. She let out a hearty laugh and said, chuckling, “They’re semi-homemade,” referring to one of her favorite old Food Network shows.
I’d never really thought of my mom’s version as being semi-homemade. Personally, when making marinara sauce and opening up a can of stewed or crushed tomatoes, it never crosses my mind that the prep is “semi-homemade” just because I didn’t start with fresh tomatoes. Now, if I opened a jar of marinara sauce, added an herb or two and poured that over freshly boiled pasta, that would be a different story.
If a recipe still calls for plenty of freshly prepared components, I don’t see anything wrong with taking a few shortcuts — like opening up a can of roasted chiles — if it gets dinner on the table faster. Using canned fire-roasted green chiles instead of roasting peppers yourself cuts the recipe time in half without sacrificing traditional Mexican flavors. I find my mom’s recipe easy and delicious. Semi-homemade or not, they’re worth the effort.

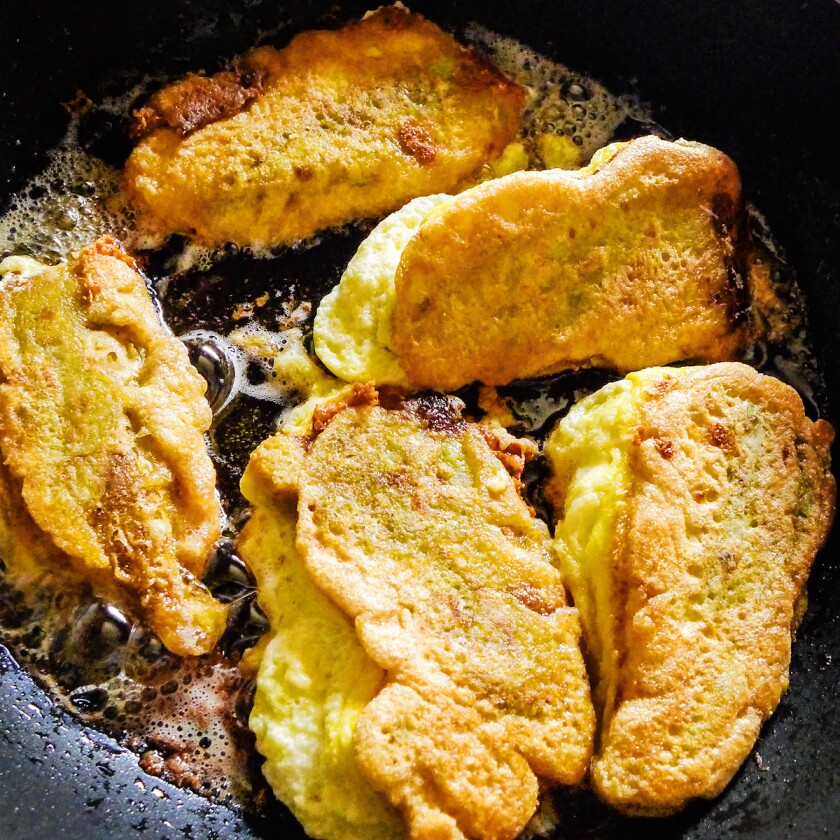
Fry the battered chiles until golden on both sides.
(Anita L. Arambula / Confessions of a Foodie)
Mom’s Chiles Rellenos
I’ve kept the essence of my mom’s recipe but added more precise measurements and detailed instructions for clarification. The amount of chiles per can varies, as they’re packed by weight, not quantity. However, you should get a minimum of 15 peppers. The cans used during my recipe testing all had 18 peppers. Leftover egg batter makes a great fluffy omelet.
Makes 6-8 servings
FOR THE PEPPERS:
⅓ cup flour
½ teaspoon salt
½ teaspoon ground black pepper
1 (27-ounce) can Ortega Whole Green Chiles, drained
2-pound block colby jack cheese, grated
Cooking oil for frying, such as canola, grapeseed or avocado oil
5 large eggs, separated
FOR THE SAUCE:
2 tablespoons cooking oil
½ large green bell pepper, thinly sliced
½ large onion, thinly sliced
1 (15-ounce) can tomato sauce
1 tablespoon chicken bouillon (I like Knorr)
1 teaspoon California chile powder
½ teaspoon whole Mexican oregano
Combine the flour, salt and pepper, set aside. Carefully stuff a chile with the shredded cheese, then place it on a rimmed baking sheet or large platter. Repeat for remaining chiles and set aside.
Line a second rimmed baking sheet with paper towels. Heat oil in a 10-inch skillet over medium-low flame. Use enough oil to cover half of the depth of a chile. Meanwhile, beat the egg whites either by hand or with an electric mixer until they are frothy and peaks hold. In a small bowl, scramble the egg yolks, then gradually fold them into the egg whites using a rubber spatula. Roll a stuffed pepper in the seasoned flour, then slide into the whipped egg, covering all sides in the batter. Carefully lift it out and slide it into the hot oil. Use a spoon to baste the top of the chile while the bottom is frying to a golden color. Carefully flip and fry the second side until golden. Transfer the chile to the prepared baking sheet to drain. Repeat with remaining chiles.
To make the sauce, heat oil in a large frying pan. Once the oil is shimmering, sauté the bell peppers and onions until the peppers have softened and the onions are translucent. Gradually add the tomato sauce, stirring to incorporate as you pour. Fill the can with water, swish to loosen up any sauce stuck to the sides of the can and pour water into the pan. Sprinkle in the bouillon and chile powder. Place oregano in your palms and rub hands together over the pan, letting the crushed oregano fall into the pan. Stir well to incorporate the seasoning. Let the sauce come to a hard simmer.
Preheat oven to 375 degrees. Remove the paper towels from underneath the chiles, gently pour the sauce over them, and then bake for about 5 minutes or until thoroughly heated. Serve with a side of rice and or freshly made beans.
Leftovers freeze well. Thaw overnight in the refrigerator. Bake for 25 minutes in a 375-degree oven or microwave on high for a few minutes or until thoroughly heated.
Recipe is copyrighted by Anita L. Arambula and is reprinted by permission from Confessions of a Foodie.
Arambula is the food section art director and designer. She blogs at confessionsofafoodie.me, where the original version of this article was published. Follow her on Instagram: @afotogirl. She can be reached at anita.arambula@sduniontribune.com.
"easy" - Google News
July 28, 2021 at 07:00PM
https://ift.tt/2Wq4FSJ
Quick and easy chiles rellenos - The San Diego Union-Tribune
"easy" - Google News
https://ift.tt/38z63U6
Shoes Man Tutorial
Pos News Update
Meme Update
Korean Entertainment News
Japan News Update
Bagikan Berita Ini


0 Response to "Quick and easy chiles rellenos - The San Diego Union-Tribune"
Post a Comment